Skip to content

Contents

  1. What is drip irrigation, and how does it work?
  2. Types of drippers to use for drip irrigation
  3. The flow rate of your drip irrigation system
  4. Calculating the pressure of your drip irrigation system
  5. How do you plan a drip irrigation system?
  6. How to layout a drip irrigation system
  7. Drip irrigation system examples
  8. How to install a drip irrigation system
  9. How long to run your drip irrigation system for?
  10. What is the best time to use your drip irrigation system?
  11. Tips for maintaining your drip irrigation system
  12. How to maintain your drip irrigation system in winter
  13. Final thoughts

What is drip irrigation, and how does it work?

A drip irrigation system is a highly efficient method of delivering water to thirsty plants and crops, comprising a simple network of pipes with low volume drip emitters attached. These drip emitters (aka drippers) are designed to slowly release a precise volume of water to the root zones of plants. Because the drip emitters release water slowly, you have greater control of the amount of water being delivered to all the plants you care for, eliminating water waste. It is possible to save up to 70% water using a drip irrigation system than conventional garden irrigation methods such as a hosepipe and spray nozzle.

Types of drippers to use for drip irrigation

There are several different types of drippers to use with differing flow rates. We will look at the available options and help you pick the kind that will work best for your garden irrigation system. Choosing the right kind of drip irrigation system can dramatically benefit both your plants, water use and results, thanks to their optimised design that considers ease of use as well as the plants in question.

Adjustable Flow drippers

The adjustable flow range of drippers is ideal for home gardens and light commercial use. Their adjustability enables you to "fine-tune" the watering application to individual plants and garden beds.

The range of adjustable drippers has a variable flow and coverage to suit your needs. Rotate the cap to increase or decrease flow; an adjustment from 0-120 litres per hour (LPH) is possible and a spread of up to 30 cm radius. Available with barb, spike and threaded versions, inline and end of line inlet styles, the choice is massive. Their large spread of water is excellent for large containers and sharing between plants grouped closely together on flower beds and borders.

Shrubblers with Adjustable Flow

The Shrubbler is a popular adjustable dripper used in landscaping and horticulture with flow rates of 0-40 LPH. They have mini outlets that stream out water gently and multiple choices for connection type including spike versions. Shrubblers with adjustable flow are available in a 360° (full-circle) version with 8 mini outlets, or a 180° (half-circle) version with 5 mini outlets. This type of dripper can spread up to 30cm radius when set to a high flow rate.

Potstream with Adjustable Flow

The Potstream is a side mounted watering solution for pot plants and containers. The adjustable gentle stream pattern of this drip irrigation system minimises soil erosion. Additionally, the variable flow rate and pattern radius allow for use in various pot sizes, small to large. This type of drip irrigation system may be suited for gardens with a variety of different sized plants that need to be cared for and watered.

Mini Bubblers with Adjustable Flow

Mini Bubblers are a great choice for applications requiring a higher flow rate. With an adjustable flow rate between 0 - 120 LPH, this high volume dripper has a gentle 360° umbrella pattern output. A typical use would be for trees and shrubs in areas that require short watering times. Mini bubblers are available with barb, spike or threaded inlets.

Fixed Flow Pressure compensating drippers

Pressure Compensating (PC) Drippers provides a constant flow rate regardless of inlet pressure- making them ideal for long run lengths or varying levels of terrain where pressure variations are likely to occur.

The PC drippers are an excellent choice for large systems and applications requiring precise watering. Available with different fixed flow rates, you can choose from 2, 4 and 8 litres per hour (LPH) models in a spike or barb version. We recommend you use the barb version either at the end of the 4mm micro pipe or insert directly into the 13mm supply pipe. The spike version is ideal for anchoring the dripper in place, ensuring reliable delivery of water.

Asta Drip PC

The Asta Drip PC spike dripper is an excellent choice for a wide range of applications including landscapes, tree lots, nurseries and shade houses. Available in three different colour-coded flow rates; 2 lph (Red), 4 lph (Black) and 8 lph (Green). The design of this dripper is advanced and far superior to most on the market.

  • Sealed turbulent flow path and diaphragm to maintain uniform discharge rates over a wide range of pressures.
  • Self-flushing cleaning action at low pressure ensures perfect operation time and time again.
  • The Inlet barb has a built-in filter and the outlet includes an insect baffle to minimise blockages.

CETA PC Drippers

The CETA dripper shares some of the sophisticated features of the Asta Drip PC, but is also able to be taken apart for inspection and cleaning. This type of dripper also sports a large clog-resistant turbulent flow path, making it very reliable even with dirty water sources. Originally designed for agricultural use, this type of dripper is ideal for irrigation systems for vineyards, orchards, row crops and landscapes.

  • Constructed of high quality UV, chemical & fertiliser resistant materials.
  • Available as a barb inlet dripper with three colour coded flow rates: 2lph (Red), 4 lph (Black) and 8 lph (Green).
  • 4 lph (Black) PC Spike & In-Line Spike models to anchor dripper at the plant root, ideal for landscape applications.

Shrubbler PC Drippers

Similar to the Shrubblers with adjustable flow, these drippers have eight mini outlets that produce a gentle stream of water. The difference with this type of dripper is that the Shrubbler PC includes a pressure compensating feature that provides a fixed diameter of 40 cms over a wide range of operating pressures. This feature ensures that your garden will receive a uniform coverage for all emitters on the same supply pipe.

  • Available in either barb model for direct connection to supply pipe, or spike models for anchoring at the roots of plants.
  • Great for use in pots, planter boxes, flower beds and other landscape applications.

Drip Line for Irrigation Systems

If you need to deliver precise amounts of water over large areas and/or distances, you may want to consider installing a drip irrigation system using drip line, instead of a conventional drip irrigation system.

This would be a suitable solution for situations such as:

  • Densely planted flower beds.
  • Borders greater than 50m².
  • Hedgerows or rows of crops that are closely planted together exceeding 50 metres length.

A drip line is a semi-flexible pipe with fixed flow drip emitters built into the pipe at set intervals along its length, usually 33cm or 50cm apart. The benefit of having the drip emitters preinstalled is the time it can save during installation.

All you need do is lay the pipe along the line you wish to irrigate and connect it to the water source. It's not a silver bullet, but in the right circumstances, a drip line can be a much better option to help save time and effort when installing a drip irrigation system.

The flow rate of your drip irrigation system

The flow rate of your drip irrigation system

When building an irrigation system, it’s important to understand how much water is available. If the flow rate is not assessed, you might design a system that exceeds the flow available from your water source. If this happens, your irrigation system will not operate correctly.

Expressed in Litres Per Hour (LPH), you can check the flow rate of your water supply using a bucket, a stopwatch and a calculator. To calculate the flow rate, time in seconds how long it takes to fill your bucket then use the formula below to determine the flow rate.

(Volume of container ÷ Time to fill the container in seconds) x 3600 = Litres Per Hour (LPH)

Our experienced staff suggest deducting 10% from the above calculation to be on the side of caution when planning how much water we have available as there can be change from one day to another.

Calculating the pressure of your drip irrigation system

Calculating the pressure of your drip irrigation system

The only way we can check the water pressure of our water source is to use a pressure gauge. You can buy a pressure gauge from our online store. Alternatively, most plumbing merchants and DIY stores stock them, too. To use, attach the pressure gauge to the outlet of the water source and then slowly open the tap. The pressure gauge will give a static water pressure reading.

We need a minimum of 1.5 BAR pressure for the irrigation system to perform optimally. If you have water pressure exceeding 3 BAR, you will need to install a pressure reducer for optimum system performance.

*If you are using a pump, refer to the technical notes indicating the pressure and flow of your pump.

How do you plan a drip irrigation system?

Now that we have an understanding of what a drip irrigation system is, the choice of drippers available, what considerations we need to have and how the system functions, we can start to design a drip irrigation system for your garden.

To figure out how we want to layout our drip irrigation system, it is best to draw a scale map of our garden. With this, we can test placement and make mistakes on paper before buying any equipment and doing any hard work.

1. Draw a rough map of your garden

We want to start by sketching out a rough map of your garden. Start by locating the house and property line. Draw in paths, terraces, sheds, greenhouses, and other significant garden features. Then indicate where lawns, borders, flower beds, trees and shrubs are located and your water source. The more information you include, the better your final drawing will be.

2. Measure your garden accurately

Using a tape measure, accurately measure your garden and record the measurements using the rough sketch of your garden you previously made. The more measurements you take, the more accurate your final drawing will be.

3. Transfer the map of your garden to graph paper

The final step to drawing a scale map of your garden is to transfer all the measurements to graph paper. Depending on the size of the area, use either a scale of 1:50, 1:100 or 1:200.

Indicate any features and obstructions you previously noted such as any paths, patios, greenhouses or sheds and then indicate all the areas that you want to be watered.

Irrigation Planning Starter Guide

For more detailed instructions on how to accurately measure your garden, visit the Garden Irrigation Planning Guide.

Go to the irrigation planning starter guide

How to layout a drip irrigation system

When we have drawn a scale map of our garden, we can start to plan our drip irrigation system. Mark everything on your map that you want to irrigate for quick reference later. When we know what we want to irrigate, we can plan our pipe route and determine how many drip emitters we require to achieve our goal.

Measuring pipe length

To determine how much supply pipe we need for our drip irrigation system, we can draw on our map a route the pipe will take from the water source to your irrigation system’s endpoint(s).

With a scale map of your garden, draw a path from your water source past all the plants you wish to irrigate. This path can do 90° turns around obstacles (using elbows) and can branch off in several paths (using tee connectors). We ideally want the irrigation system to look neat and tidy, or better yet, hidden from sight. Consider the best route for the pipework to follow to ensure it is out of sight. This could be underground (up to 5cm), under mulch, hidden behind bushes, or neatly pinned to a wall or fence.

The path we have drawn represents the main supply route. The pipe used for this is either a 13mm or 19mm Irrigation Supply Pipe, an LDPE pipe that is UV and weather protected, is easy to cut to size and works in conjunction with 13mm or 19mm irrigation connectors, respectively.

From this main supply pipe, we can branch off to 4mm Micro Supply Pipe to run to the plant to be watered. We do this for every plant we have, or if we have multiple plants close together, we can connect to the main supply pipe once, and then use Micro Tee connectors to branch off to multiple plants. We can also use inline drippers to make a chain of drippers on one off shoot from the main supply pipe. We recommend having a maximum of 5 drippers connected to a single off shoot to ensure optimum performance of the drippers. We can also connect barb drippers directly to the main supply pipe if the pipe runs very close to the plant to be watered.

All the components are available to buy separately, so you can easily customise how you want your system to be configured. Later in the guide, we talk about different types of configurations for different scenarios.

TOP TIP: If you need to run your pipe up and over a wall, consider planning for some extra elbow connectors to allow you to achieve this. We want to avoid kinking the pipe, so it is important to consider using elbows whenever we have tight turns to install for.

Calculating the number of drippers you need

A good rule of thumb for determining how many drippers you require is to simply count how many plants you want to water. If you are using the Shrubblers, you can use these to cover multiple plants that are grouped closely together. If you plan to use fixed flow pressure compensating drippers, these are best used individually for each plant. You may even want multiple drippers covering a single plant if it has a large base and requires lots of water.

If you are considering using the Potstream drippers, you must have at least one for every plant container you plan to irrigate. For long containers like troughs, you may need to plan to have more than one Potstream drippers to get good coverage.

Outlets, fixings and connectors

Now that we know how we want to run the main supply pipe and how many drippers we want to use, we can start to count up the outlets, fixings and connectors required based on your plan. For instance, count how many times you branch the pipe off in different directions to determine how many tee connectors you require, or how many 90° turns you make to determine how many elbow connectors you require, or how many dead ends you have to determine how many stop end connectors you require. In the next section of this guide, we have a complete list of recommended parts for garden watering systems, and their uses to help you plan a shopping list of your own.

TOP TIP: It's always worth buying a few more fittings than planned as this way you can make sure there are no nasty surprises when completing the installation and you won't be left short of any components. We find that we are always short of elbows, wall clips and pipe stakes.

Drip irrigation system examples

Below we have created some typical scenarios where we plan to use a drip irrigation system. We have outlined the scenario and provided a list of components required to be able to install a drip irrigation system for that scenario.

Drip Irrigation Example - Flower Pots and Containers

Example of a drip irrigation system installed for patio pots and containers

Scenario - We have a patio with 20 pots placed on it, and we want to water them whilst away on holiday. Each pot contains just one plant each, and they are all roughly the same size and have roughly the same watering requirement. The garden tap is right next to the patio as well. We follow the plan and determine that we need 15 metres of supply pipe to run from the tap, past all of the containers and to the last plant pot.

Here is what we would be looking to buy to complete a garden watering system for patio pots and containers.

  • Water Timer - Pick an easy to program water timer for automatic daily watering. Our favourites are the Claber Water Timers.
  • Nut and Tail Tap Adaptor - This fits to the outlet of the water timer and allows the main supply pipe to be connected.
  • 15 Metres of 13mm Irrigation Supply Pipe - This is the main carrier of water (doesn't release water) and runs past all the plant pots and containers.
  • 13mm elbows, tee connectors, stop end connectors etc. - Based on the plans requirements, choose 13mm connectors to guide the pipe around the garden and terminate end points.
  • Pipe Stakes and Wall Clips - Available for both 13mm and 4mm pipe, this secures the pipe in place. Use the stakes to secure the pipe to soil or wall clips to secure the pipe to walls and fences.
  • Irrigation Hole Punch - This is used to punch holes in the Irrigation Supply Pipe to then insert tube adaptors into (we'll discuss more in installation later).
  • 20 x 4mm Tube Adaptors - Used to make the connection between 13mm and 4mm pipe via a punched hole. We need one for each plant pot.
  • Blanking Plugs - A.K.A. Goof Plugs, are useful if we make any errors or change our minds after piercing our holes in the main supply pipe for our tube adaptors to connect to.
  • 10 Metres of 4mm Micro Supply Pipe - This takes the water from the 13mm pipe to the drippers in each plant pot. We plan for about 50cm for each plant pot.
  • 20 x Fixed Flow Pressure Compensating Drippers - We use Pressure Compensating Drippers to ensure an even amount of water is released to every plant.
  • We might also consider purchasing a Pressure Reducer and an Irrigation Filter as well to help protect the system.

Drip Irrigation Example - Hanging Baskets

Example of a drip irrigation system installed for hanging baskets

Scenario - We have a house/pub with 10 hanging baskets around the perimeter, and we want to water them automatically. The garden tap is at the rear of the property. We follow the plan and determine that we need 20 metres of supply pipe to run from the tap, past all of the hanging baskets and to the last plant pot.

Here is what we would be looking to buy to complete a full watering system for hanging baskets.

  • Water Timer - Pick an easy to program water timer for automatic daily watering. Our favourites are the Claber Water Timers.
  • Nut and Tail Tap Adaptor - This fits onto the outlet of the water timer and allows the main supply pipe to be connected.
  • 13mm Irrigation Supply Pipe - This is the main carrier of water (doesn't release water) and runs past all the hanging baskets. We would want to run this up once to the height of the hanging baskets (or higher if it is easier to hide), then we would run it past all the baskets.
  • 13mm Elbows, tee connectors, stop ends etc. - Based on the plant's requirements, choose 13mm connectors to guide the pipe around the house and terminate runs.
  • Wall Clips - Available for both 13mm and 4mm pipe, this secures the pipe in place. Use the wall clips to secure the pipe to walls and fences.
  • Irrigation Hole Punch - This is used to punch holes in the Irrigation Supply Pipe to then insert tube adaptors into (we'll discuss more in installation later).
  • 10 x 4mm Tube Adaptors - Used to make the connection between 13mm and 4mm pipe via a punched hole.
  • Blanking Plugs - A.K.A. Goof Plugs, are useful if we make any errors or change our minds after piercing our holes in the main supply pipe for our tube adaptors to connect to.
  • 4mm Micro Supply Pipe - This takes the water from the 13mm pipe to the drippers in each hanging basket.
  • 10 x Fixed Flow Pressure Compensating Drippers - We use Pressure Compensating Drippers to ensure an even amount of water is released to every plant.
  • We may also consider purchasing a Pressure Reducer and an Irrigation Filter as well to help protect the system.

Drip Irrigation Example - Flower Beds and Borders

Example of a drip irrigation system installed for flower beds and borders

Scenario - We have a front and rear garden with flower borders with a width of 1m around the perimeter of each, and we want to water them automatically. All the flowers are bunched closely together within the borders. The garden tap is at the rear of the property. We follow the plan and determine that we need 50 metres of supply pipe to run from the tap and through all of the flower borders. We decide to divide the system into two zones, one for the front and one for the rear.

  • Dual Outlet Water Timer - Because we are dividing the system into two zones, we require two timers, or to keep it simple, a timer with two outlets. The Claber Dual Select Outlet Water Timer is the best to pick for this situation.
  • 2 x Nut and Tail Tap Adaptor - This fits to the outlets of the water timer and allows the main supply pipe to be connected. One for each outlet.
  • 13mm Irrigation Supply Pipe - This is the main carrier of water (doesn't release water) and runs through all the flower borders.
  • 13mm Elbow, tee connectors, and stop end - Based on the plan of our irrigation system, choose 13mm connectors to guide the pipe around the house and terminate runs.
  • Pipe Stakes and Wall Clips - Available for both 13mm and 4mm pipe, this secures the pipe in place. Use the stakes to secure the pipe to soil or wall clips to secure the pipe to walls and fences.
  • Irrigation Hole Punch - This is used to punch holes in the Irrigation Supply Pipe to then insert tube adaptors into (we'll discuss more in installation later).
  • 4mm Tube Adaptors - Used to make the connection between 13mm and 4mm pipe via a punched hole.
  • Blanking Plugs - A.K.A. Goof Plugs, are useful if we make any errors or change our minds after piercing our holes in the main supply pipe for our tube adaptors to connect to.
  • 4mm Micro Supply Pipe - This takes the water from the 13mm pipe to the drippers we position in the flower beds.
  • Shrubbler Adjustable Drippers - Because the Shrubbler adjustable drippers have a greater coverage than the Pressure Compensating drippers, it makes them an ideal choice for densely populated flower borders. Instead of installing one for every plant, we can have multiple plants covered by just one dripper. We would use approximately 3 drippers for every metre of flower border.
  • We may also consider purchasing a Pressure Reducer and an Irrigation Filter as well to help protect the system.

How to install a drip irrigation system

Now that we have everything planned, we have all the parts for our irrigation system delivered, and we're ready to go, we can start installing our drip irrigation system.

For installation, you will need either a Stanley knife, a large pair of scissors or secateurs to cut the pipe, a hole punch to pierce holes in the main supply pipe, and a mallet/hammer to fix the pipe stakes and wall clips in place.

Connect to the tap

We start by attaching the water timer directly to the garden tap – it should be able to screw straight on. When we have installed the water timer, we can connect the irrigation supply pipe to the outlet of the water timer using the nut and tail tap adaptor. If we’re using a pressure reducer, this is added to the outlet of the water timer first, then attach the nut and tail tap adaptor.

Create a pipe network

To make the pipe more manageable, roll it out and let it warm up in the sunshine before use. When ready, lay the irrigation supply pipe around the area to be irrigated.

Cut the main supply pipe using your chosen cutting tool and use the required fittings (elbows, tee pieces, stop ends etc.) to create the network as per your drawing. Ensure your cuts are clean and perpendicular to the pipe to ensure the best connection to your fittings.

TOP TIP: If you have difficulty pushing the fittings into the main supply pipe, dip the end of the irrigation pipe into hot water (not boiling water). Experienced installers suggest carrying a thermos of hot water to warm the pipe in.

Anchor and fix the irrigation pipe in place using pipe stakes and wall clips. The ideal placement of stakes and wall clips for the main supply pipe is one every 50-150cm.

The main supply pipe should ideally be laid within 30cm of the location of drip emitters if they are to be connected with a short length of micro pipe. The longest length of micro supply pipe we want to use is 100cm.

TOP TIP: Flush through the main supply pipe. Do this by keeping ends open and running water through the pipe for 4-5 minutes. This will flush out any dirt and debris that may have entered the pipe during installation.

Connecting the drippers

As you discovered at the start of this guide, drippers have different types of connections and sometimes are built on a spike or without. We'll take you through the installation of these different types of drippers.

Barb Drippers

When using barb drippers, we can either insert them directly to the side of LDPE pipe (13mm or 19mm) or to the end of a length of 4mm pipe.

To insert directly to the side of LDPE pipe, we simply need to pierce a hole using an irrigation hole punch, then insert the barb inlet of the dripper into the hole.

If using the drippers in conjunction with micro supply pipe, push the micro supply pipe onto the barb inlet of the dripper. Fix in place using a micro tube stake.

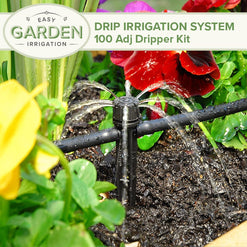
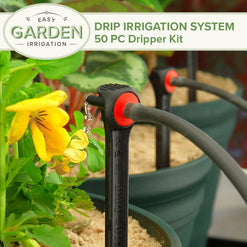
Ensure the dripper is positioned close enough to the plant to provide water. If using adjustable drippers, you can share this between multiple plants grouped closely together.

TOP TIP: If you pierce a hole in the wrong place, you can use a micro blanking plug (aka Goof Plug) to close and seal the hole.

Spike Drippers

Whenever we use spike drippers, we want to connect them to the end of 4mm pipe. Simply push the barb inlet of the dripper into the end of the micro supply pipe, then anchor the dripper in place.

Some spike drippers are referred to as inline spikes. These allow you to connect a 4mm pipe to the inlet and then continue a chain of drippers by connecting a 4mm pipe to the outlet. We recommend only creating a chain of 3-4 drippers at a time. When ending the chain, use a normal spike dripper with only an inlet to terminate the run.

Threaded Inlet Drippers

The Shrubbler and Mini Bubbler adjustable drippers are available with a threaded inlet (either a 4mm thread or a ½” BSPF thread).

Use the 4mm threaded inlet dripper with a rigid riser or a spray stake. Useful for when you want to elevate a dripper for greater coverage. Use the ½” threaded inlet drippers with a ½” poly riser.

Connect and test the irrigation system

Everything should be connected and ready to test. Turn the system on and walk around to check for any leaky joints, drippers that aren't performing as expected, and check all areas of your garden are receiving adequate water.

Once the system has been tested, you can move on to programming your water timer of choice. The following section in this guide are recommendations for programming your water timer.

How long to run your drip irrigation system for?

When using your drip irrigation system, you should remember that over-watering or underwatering can give your plants unnecessary stress. We advise that you take time to research how much water your plants require to stay healthy and flourish. You can accurately determine how long and how often you will need to run your drip irrigation system for when you know this information.

Avoid running your irrigation system for frequent, short periods of time as this causes the roots to stay near the surface and dry out quicker. For healthy plants, deliver enough water to ensure deep penetration. Deep penetration decreases the chance of evaporation and ultimately reduces water consumption.

Below is a rough guide to how long you should run your system throughout the year.

Spring Summer Autumn
20-30 mins, 3-4 times per week 20-30 mins, every day of the week 15-20 mins, 2-3 times per week

To find a run time that suits your garden's needs, start by running your irrigation system two or three times a week for 30 minutes. After each watering cycle, check the water has penetrated the soil to a depth of at least 20cms (8 inches) to encourage the best root growth. The soil should be damp but not saturated. If the soil is still dry, increase the run time by 3-5 minutes. Repeat this process until you find the ideal run time for your garden.

TOP TIP: Cover your garden beds and borders using mulch or bark to avoid water loss through evaporation. This is especially important during the Summer months when the sun is hottest.

What is the best time to use your drip irrigation system?

Our experts recommend using an irrigation system early in the morning, shortly after sunrise. You can also water your garden in the late afternoon, a couple of hours before sunset. The main thing to note is to avoid watering in the heat of the day to prevent the water from evaporating before your plants quench their thirst.

Tips for maintaining your drip irrigation system

There is some essential maintenance required to keep your drip irrigation system working at its best.

  • Every now and then take a walk around your irrigation system and check the emitters are working correctly and do not need cleaning or replacing. Visually check they are performing as expected. If they are not working as expected, you may need to flush the system and clean or replace the affected drippers.
  • If a fox chews through any of your supply pipes, or you accidentally cut through one with your spade, you can repair it using a straight/joiner. Using a good cutting tool, cut out the damaged section and rejoin the supply pipe using a joiner.

How to prevent water clogging

If you have a dirty water supply, you will want to use a filter to prevent clogging your drip emitters. Keep the filter clean by rinsing in water every couple of months to remove trapped dirt and debris.

It is also good practice to flush your irrigation system regularly throughout the year to ensure any trapped dirt or debris do not clog up your drippers. The best way to flush the system is to remove stop ends from the main supply lines. Flush each zone of your irrigation system for 4-5 minutes.

How to maintain your drip irrigation system in winter

To make sure your drip irrigation system is performing at its best for years to come, we need to take some steps before the winter months set in to protect our system from frost damage.

  • The most expensive items in a system are your tap timers, pressure reducers and filters and are sensitive to freezing conditions. Remove them from the irrigation system and empty them of water before winter. The best way to empty is to hold them upside down and give them a good shake-store in a dry place, preferably indoors (not in your garden shed, it's still cold in there).
  • Main Supply Pipes - We’re frequently asked “Do I need to take the system in for the winter?”. The simple answer is no. You should, however, do your best to drain the system of excess water to prevent damage from freezing water. Remove all the stop ends in your system and any other connectors at low points that can help drain excess water from the system.

TOP TIP: To prevent any insects from crawling inside your system and causing a blockage, replace the connectors after draining the water. It is also good to flush the system after the winter months in case they still manage to find their way in.

Final thoughts

We hope this guide is helpful to you, with some helpful tips and tricks to manage your drip irrigation system in your own garden.

If you have any other questions or concerns about your irrigation system, please feel free to contact our team of experts who will help you.

For more garden irrigation tips and advice, you can explore our other helpful irrigation resources below:

More Resources

Want to explore more?

Browse our entire drip irrigation collection. You can also explore our garden irrigation kits. Otherwise, discover some of our best-selling products below.

Discover Drip Irrigation Systems

Just ask, we're really friendly

If you need to ask us a question about anything, you can reach us either by calling our sales line, or by dropping us an email.